หลังจากที่ หัดใช้ Route และ View เบื้องต้น แล้ว ในตอนนี้เรามาดูวิธีเขียน Laravel เพื่อเชื่อมต่อฐานข้อมูลกัน
โดยจะใช้วิธีการทำ migrate หรือ migration ของ Laravel ซึ่งเปรียบเสมือนเป็นการจัดการควบคุมเวอร์ชั่นของฐานข้อมูล (version control ของ database) เพื่อให้ laravel ทราบว่า โครงสร้างตารางที่ใช้นั้นมีการเปลี่ยนแปลงไปอย่างไร และจะสร้าง แก้ไข หรือลบไฟล์ที่เกี่ยวข้องตามโครงสร้างที่เปลี่ยนไปได้โดยอัตโนมัติ
แล้วใช้ Eloquent ORM เพื่อดึงข้อมูลออกมา
คอนฟิกฐานข้อมูล
เริ่มจากการสร้าง database เพื่อใช้ทดสอบ แล้ว GRANT สิทธิ์เพื่อกำหนดชื่อผู้ใช้ (user) และรหัสผ่าน (password) ในการเชื่อมต่อเข้าฐานข้อมูล
mysql> CREATE DATABASE laravel;

mysql> GRANT ALL ON laravel.* TO 'laravel'@'localhost' IDENTIFIED BY 'laravel-password';
หมายเหตุ ชื่อฐานข้อมูลหรือชื่อผู้ใช้ไม่จำเป็นต้องเป็นชื่อ laravel จะเป็นชื่ออะไรก็ได้ แต่ต้องตรงกับไฟล์คอนฟิกที่เราจะแก้ไขต่อไป
cd เข้าไปในไดเร็กทอรีที่สร้างแอพไว้
[alice@cent6-php ~]$ cd /var/www/html/blog/
ไฟล์คอนฟิกในการเชื่อมฐานข้อมูล จะถูกกำหนดอยู่ในไฟล์ app/config/database.php
Laravel รอบรับฐานข้อมูลได้หลายชนิดทั้ง mysql, sqlite, pgsql ในที่นี้จะกำหนดค่า ‘default’ หรือชนิดของฐานข้อมูลที่จะใช้เป็น mysql
ถ้ากำหนดค่าเป็น mysql ก็ต้องแก้ไขค่าตัวแปรที่ใช้เชื่อมฐานข้อมูลใน array [‘connections][‘mysql’] โดยแก้ไขค่าต่างๆ ให้ตรงกับที่ GRANT สิทธิ์ไว้ตอนแรก
ตัวอย่างการแก้ไขไฟล์
[alice@cent6-php blog]$ vi app/config/database.php
...
    /*
    |--------------------------------------------------------------------------
    | Default Database Connection Name
    |--------------------------------------------------------------------------
    |
    | Here you may specify which of the database connections below you wish
    | to use as your default connection for all database work. Of course
    | you may use many connections at once using the Database library.
    |
    */

    'default' => 'mysql',
...
    /*
    |--------------------------------------------------------------------------
    | Database Connections
    |--------------------------------------------------------------------------
    |
    | Here are each of the database connections setup for your application.
    | Of course, examples of configuring each database platform that is
    | supported by Laravel is shown below to make development simple.
    |
    |
    | All database work in Laravel is done through the PHP PDO facilities
    | so make sure you have the driver for your particular database of
    | choice installed on your machine before you begin development.
    |
    */

    'connections' => array(

        'sqlite' => array(
            'driver'   => 'sqlite',
            'database' => __DIR__.'/../database/production.sqlite',
            'prefix'   => '',
        ),

        'mysql' => array(
            'driver'    => 'mysql',
            'host'      => 'localhost',
            'database'  => 'laravel',
            'username'  => 'laravel',
            'password'  => 'laravel-password',
            'charset'   => 'utf8',
            'collation' => 'utf8_unicode_ci',
            'prefix'    => '',
        ),
รัน migrate เพื่อแก้ไขโครงสร้างฐานข้อมูล
รัน php artisan โดยเริ่มต้นระบุออปชั่นเป็น migrate:make ตามด้วยชื่ออะไรก็ได้ เพื่อจะสร้างไฟล์คลาส
คำแนะนำ ให้ตั้งชื่อให้สอดคล้องกับสิ่งที่กำลังจะแก้ไขโครงสร้างฐานข้อมูล เพราะชื่อนี้จะนำไปใช้ในการตั้งชื่อคลาสด้วย เข่นในที่นี้เราจะสร้างตาราง users ขึ้นมา เราก็ตั้งเป็น create_users_table
[alice@cent6-php blog]$ php artisan migrate:make create_users_table
Created Migration: 2015_01_08_135602_create_users_table
Generating optimized class loader
Compiling common classes
Compiling views
คำสั่ง php artisan migrate:make จะสร้างไฟล์ class ขึ้นมาไว้ในไดเร็กทอรี app/database/migrations/
[alice@cent6-php blog]$ ls -l app/database/migrations/
total 4
-rw-r--r--. 1 alice users 326 Jan  8 20:56 2015_01_08_135602_create_users_table.php
ดูไฟล์ class ได้ สังเกตว่า Laravel จะแปลงชื่อที่ตั้งไว้เป็นชื่อคลาส โดยตัดเครื่องหมาย _ ออก พร้อมเปลี่ยนแต่ละคำเป็นตัวอักษรพิมพ์ใหญ่ (CamelCase)
[alice@cent6-php blog]$ cat app/database/migrations/2015_01_08_135602_create_users_table.php
...

use Illuminate\Database\Schema\Blueprint;
use Illuminate\Database\Migrations\Migration;

class CreateUsersTable extends Migration {

	/**
	 * Run the migrations.
	 *
	 * @return void
	 */
	public function up()
	{
		//
	}

	/**
	 * Reverse the migrations.
	 *
	 * @return void
	 */
	public function down()
	{
		//
	}

}
ไฟล์นี้จะเป็นตัวกำหนดโครงสร้างฐานข้อมูลที่เปลี่ยนไป
เมธอด up() ไว้สำหรับการเปลี่ยนแปลงโครงสร้างข้อมูล เข่นเพิ่ม ลบ แก้ ตารางหรือฟิลด์ต่างๆ
เมธอด down() จะยกเลิกการเปลี่ยนแปลง (rollback) สิ่งที่ถูกเปลี่ยนไปโดยเมธอด up()
ตัวอย่างด้านล่าง ในเมธอด up() จะสร้างตารางชื่อ “users” ประกอบด้วยฟิลด์ id, email, name, timestamps()
หมายเหตุ timestamps() จะเป็นการสร้างฟิลด์ชื่อ created_at และ updated_at ชนิด timestamp เพื่อเก็บเวลาที่แต่ละเรคอร์ด (rows) มีการเปลี่ยนแปลง
ส่วนเมธอด down() เราก็กำหนดไว้เป็นยกเลิกการสร้างตาราง หรือ drop ตารางที่สร้างไว้นั่นเอง
[alice@cent6-php blog]$ vi app/database/migrations/2015_01_08_135602_create_users_table.php
...

class CreateUsersTable extends Migration {

    /**
     * Run the migrations.
     *
     * @return void
     */
    public function up()
    {
        // create table
        Schema::create('users', function($table)
        {
            $table->increments('id');
            $table->string('email')->unique();
            $table->string('name');
            $table->timestamps();
        });
    }

    /**
     * Reverse the migrations.
     *
     * @return void
     */
    public function down()
    {
        // drop table
        Schema::drop('users');
    }
}
หลังจากแก้ไขไฟล์คลาสเรียบร้อยแล้ว รัน php artisan อีกครั้ง แต่ครั้งนี้ระบุแค่ออปชั่น migrate
[alice@cent6-php blog]$ php artisan migrate
**************************************
*     Application In Production!     *
**************************************

Do you really wish to run this command? y
Migration table created successfully.
Migrated: 2015_01_08_135602_create_users_table
ตอบ y เพื่อยืนยัน
ผลลัพธ์ที่ได้ จากการรัน migrate จะมีการเปลี่ยนแปลงโครงสร้างตารางตามที่กำหนดไว้ในเมธอด up()
mysql> SHOW TABLES;
+-------------------+
| Tables_in_laravel |
+-------------------+
| migrations        |
| users             |
+-------------------+
2 rows in set (0.00 sec)
ตาราง migrations เป็นตารางพิเศษ จะเก็บประวัติการรัน migrate เพื่อเวลาย้อนกลับ (rollback) จะได้ทำอย่างถูกต้อง
mysql> SELECT * FROM migrations;
+--------------------------------------+-------+
| migration                            | batch |
+--------------------------------------+-------+
| 2015_01_08_135602_create_users_table |     1 |
+--------------------------------------+-------+
1 row in set (0.00 sec)
ลองดูตาราง users ที่ถูกสร้างขึ้น
mysql> DESCRIBE users;
+------------+------------------+------+-----+---------------------+----------------+
| Field      | Type             | Null | Key | Default             | Extra          |
+------------+------------------+------+-----+---------------------+----------------+
| id         | int(10) unsigned | NO   | PRI | NULL                | auto_increment |
| email      | varchar(255)     | NO   | UNI | NULL                |                |
| name       | varchar(255)     | NO   |     | NULL                |                |
| created_at | timestamp        | NO   |     | 0000-00-00 00:00:00 |                |
| updated_at | timestamp        | NO   |     | 0000-00-00 00:00:00 |                |
+------------+------------------+------+-----+---------------------+----------------+
5 rows in set (0.00 sec)
ตาราง users ยังไม่มีข้อมูลใดๆ
mysql> SELECT * FROM users;
Empty set (0.00 sec)
ถ้าตารางที่สร้างไว้ไม่ถูกต้อง หรือต้องการยกเลิก สามารถรัน rollback เพื่อเรียกเมธอด down() ได้
[alice@cent6-php blog]$ php artisan migrate:rollback
**************************************
*     Application In Production!     *
**************************************

Do you really wish to run this command? y
Rolled back: 2015_01_08_135602_create_users_table
ตาราง users ก็จะถูก drop ไป
mysql> SHOW TABLES;
+-------------------+
| Tables_in_laravel |
+-------------------+
| migrations        |
+-------------------+
1 row in set (0.00 sec)

mysql> SELECT * FROM migrations;
Empty set (0.00 sec)
รัน migrate อีกครั้ง เพื่อสร้างตาราง users กลับมา
[alice@cent6-php blog]$ php artisan migrate
**************************************
*     Application In Production!     *
**************************************

Do you really wish to run this command? y
Migrated: 2015_01_08_135602_create_users_table


mysql> SHOW TABLES;
+-------------------+
| Tables_in_laravel |
+-------------------+
| migrations        |
| users             |
+-------------------+
2 rows in set (0.01 sec)
การใช้ Eloquent ORM เพื่อดึงข้อมูล
หลังจากได้ตารางแล้ว เราลองมาเขียน Laravel เพื่อดึงข้อมูลจากฐานข้อมูลกัน
ใน Laravel หรือ MVC ส่วนของโปรแกรมที่จะใช้ในการเชื่อมต่อกับฐานข้อมูลเราจะเรียกว่า Models โดย Laravel จะกำหนดให้สร้างเป็นไฟล์คลาสไว้ในไดเร็กทอรี app/models/
ตัวอย่างเช่น ต้องการเชื่อมกับตาราง users แนะนำให้ตั้งชื่อคลาส User และสร้างไฟล์คลาสชื่อ User.php
ตัวอย่างของไฟล์คลาส User.php ด้านล่างนี้ ติดมาจากการติดตั้ง laravel อยู่แล้ว ไม่ต้องแก้ไขอะไร
[alice@cent6-php blog]$ vi app/models/User.php
...
use Illuminate\Auth\UserTrait;
use Illuminate\Auth\UserInterface;
use Illuminate\Auth\Reminders\RemindableTrait;
use Illuminate\Auth\Reminders\RemindableInterface;

class User extends Eloquent implements UserInterface, RemindableInterface {

	use UserTrait, RemindableTrait;

	/**
	 * The database table used by the model.
	 *
	 * @var string
	 */
	protected $table = 'users';

	/**
	 * The attributes excluded from the model's JSON form.
	 *
	 * @var array
	 */
	protected $hidden = array('password', 'remember_token');

}
โดยดีฟอลต์ Laravel จะทำการ map ชื่อคลาสที่ตั้งไว้ใน models กับชื่อตาราง table ในฐานข้อมูลโดยเติมตัว (s) โดยอัตโนมัติ เช่นในที่นี้ชื่อคลาส User จะถูกแปลงเป็นชื่อตาราง users แต่ถ้าไม่ตรงตามรูปแบบนี้เราสามารถกำหนดไว้ในตัวแปรหรือพรอพเพอรตี้ $table ได้
แก้ไขไฟล์ routes.php เพื่อให้เวลาเรียกพาธ /users ให้มาเรียกใช้ models ที่ชื่อว่า User
[alice@cent6-php blog]$ vi app/routes.php
...
/*
|--------------------------------------------------------------------------
| Application Routes
|--------------------------------------------------------------------------
|
| Here is where you can register all of the routes for an application.
| It's a breeze. Simply tell Laravel the URIs it should respond to
| and give it the Closure to execute when that URI is requested.
|
*/

Route::get('/', function()
{
    return View::make('hello');
});

Route::get('users', function()
{
    $users = User::all();

    return View::make('users')->with('users', $users);
});
คำอธิบาย User::all() เป็นการเรียกคลาส User ใน models เมธอด all() จะเป็นการแสดงทุกเรคอร์ดในตาราง users ซึ่ง Laravel จะจัดการให้เองโดยอัตโนมัติ
ส่วน View::make(‘users’)->with(‘users’, $users) จะเป็นการส่งค่าที่เก็บในตัวแปร $users เข้าไปใน views ที่ชื่อ users
จาก หัดใช้ Route และ View เบื้องต้น เราต้องแก้ไขไฟล์ users.blade.php เพิ่มเติม เพื่อให้สามารถวนลูปเรคอร์ดที่ได้จากตาราง users
ตัวอย่างการแก้ไขไฟล์
[alice@cent6-php blog]$ vi app/views/users.blade.php
@extends('layout')

@section('content')
    @foreach($users as $user)
        <p>{{ $user->name }}</p>
    @endforeach
@stop
ส่วนไฟล์ layout.blade.php เหมือนเดิม
ทดลองเปิดบน browser
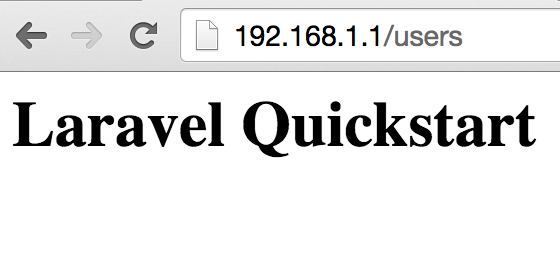
เนื่องจากตาราง users ยังไม่มีข้อมูลอะไร
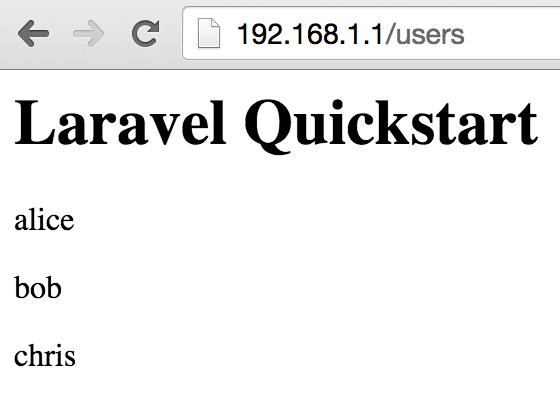
ทดลองใส่ข้อมูลเข้าไปในตาราง users
mysql> INSERT INTO users (email, name) VALUES ('alice@example.com', 'alice');
Query OK, 1 row affected (0.00 sec)

mysql> INSERT INTO users (email, name) VALUES ('bob@example.com', 'bob');
Query OK, 1 row affected (0.01 sec)

mysql> INSERT INTO users (email, name) VALUES ('chris@example.com', 'chris');
Query OK, 1 row affected (0.00 sec)
ลองเปิดบน browser อีกครั้ง