บทความนี้แสดงวิธีการติดตั้ง Oracle Database 11g Release 2 โดยทดสอบบน CentOS 6.5 (x86_64) เผื่อเป็นประโยชน์ ให้สามารถทดลองใช้ Oracle Database ในการเรียนรู้ หลักการ และคำสั่งต่างๆ ก่อนที่จะไปใช้กับเครื่องจริง
ความต้องการขั้นต่ำของเครื่องที่จะติดตั้ง
- Memory 2GB
- Swap ขนาด 1.5 เท่าของ Memory
ส่วน Disk ขอแยกปริมาณการใช้ดิสก์ดังนี้
- ติดตั้ง CentOS 6.5 (Minimal Desktop) 2.6 GB
- ไฟล์ zip ที่ดาวน์โหลดมาจาก Oracle 2.2 GB
- ขนาดไฟล์หลัง unzip 2.4 GB
- ขนาดไฟล์หลังติดตั้ง 5.5 GB
ติดตั้งไฟล์ rpm เพิ่มเติม
แนะนำให้ติดตั้ง CentOS แบบเลือกติดตั้งชุดซอฟต์แวร์ Minimal Desktop
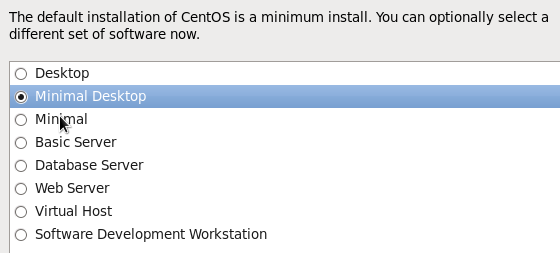
แล้วใช้ yum ติดตั้งแพ็คเกจเพิ่มเติมดังนี้
[root@cent6-oracle11g2 ~]# yum install gcc
[root@cent6-oracle11g2 ~]# yum install compat-libstdc++-33
[root@cent6-oracle11g2 ~]# yum install elfutils-libelf-devel
[root@cent6-oracle11g2 ~]# yum install gcc-c++
[root@cent6-oracle11g2 ~]# yum install libaio-devel
[root@cent6-oracle11g2 ~]# yum install unixODBC
[root@cent6-oracle11g2 ~]# yum install unixODBC-devel
ต้องติดตั้งแพ็คเกจ i686 ด้วย
[root@cent6-oracle11g2 ~]# yum install libaio.i686
[root@cent6-oracle11g2 ~]# yum install compat-libstdc++-33.i686
[root@cent6-oracle11g2 ~]# yum install libaio-devel.i686
[root@cent6-oracle11g2 ~]# yum install libstdc++.i686
[root@cent6-oracle11g2 ~]# yum install unixODBC.i686
[root@cent6-oracle11g2 ~]# yum install unixODBC-devel.i686
จริงๆ แล้ว Oracle Database ต้องการแพ็คเกจ pdksh แต่ใน CentOS 6 ไม่มี เราสามารถติดตั้ง ksh แทนที่ได้
[root@cent6-oracle11g2 ~]# yum install ksh
แก้ไขไฟล์ hosts
แก้ไข DNS หรือไฟล์ /etc/hosts เพื่อให้สามารถแปลงขื่อ hostname ของเครื่องเป็น IP Address ได้
[root@cent6-oracle11g2 tmp]# hostname
cent6-oracle11g2

[root@cent6-oracle11g2 tmp]# ping cent6-oracle11g2
ping: unknown host cent6-oracle11g2
ตัวอย่างการแก้ไขไฟล์ /etc/hosts
[root@cent6-oracle11g2 ~]# vi /etc/hosts
127.0.0.1   localhost localhost.localdomain localhost4 localhost4.localdomain4
::1         localhost localhost.localdomain localhost6 localhost6.localdomain6
192.168.5.112 cent6-oracle11g2
หลังการแก้ไข
[root@cent6-oracle11g2 tmp]# ping cent6-oracle11g2
PING cent6-oracle11g2 (192.168.5.112) 56(84) bytes of data.
64 bytes from cent6-oracle11g2 (192.168.5.112): icmp_seq=1 ttl=64 time=0.061 ms
64 bytes from cent6-oracle11g2 (192.168.5.112): icmp_seq=2 ttl=64 time=0.065 ms
^C
--- cent6-oracle11g2 ping statistics ---
2 packets transmitted, 2 received, 0% packet loss, time 1377ms
rtt min/avg/max/mdev = 0.061/0.063/0.065/0.002 ms
สร้าง group และ user ของ oracle
[root@cent6-oracle11g2 ~]# groupadd oinstall
[root@cent6-oracle11g2 ~]# groupadd dba
[root@cent6-oracle11g2 ~]# useradd -g oinstall -G dba oracle

[root@cent6-oracle11g2 ~]# id oracle
uid=500(oracle) gid=500(oinstall) groups=500(oinstall),501(dba)
เปลี่ยนรหัสผ่าน
[root@cent6-oracle11g2 ~]# passwd oracle
Changing password for user oracle.
New password:
Retype new password:
passwd: all authentication tokens updated successfully.
แก้ไขค่า Kernel Parameters
ดีฟอลต์จากการติดตั้ง CentOS 6.5
[root@cent6-oracle11g2 ~]# sysctl -a | grep aio-max-nr
fs.aio-max-nr = 65536
[root@cent6-oracle11g2 ~]# sysctl -a | grep file-max
fs.file-max = 201530
[root@cent6-oracle11g2 ~]# sysctl -a | grep shmall
kernel.shmall = 4294967296
[root@cent6-oracle11g2 ~]# sysctl -a | grep shmmax
kernel.shmmax = 68719476736
[root@cent6-oracle11g2 ~]# sysctl -a | grep shmmni
kernel.shmmni = 4096
[root@cent6-oracle11g2 ~]# sysctl -a | grep sem
kernel.sem = 250        32000   32      128
[root@cent6-oracle11g2 ~]# sysctl -a | grep ip_local_port_range
net.ipv4.ip_local_port_range = 32768    61000
[root@cent6-oracle11g2 ~]# sysctl -a | grep rmem_default
net.core.rmem_default = 124928
[root@cent6-oracle11g2 ~]# sysctl -a | grep rmem_max
net.core.rmem_max = 124928
[root@cent6-oracle11g2 ~]# sysctl -a | grep wmem_default
net.core.wmem_default = 124928
[root@cent6-oracle11g2 ~]# sysctl -a | grep wmem_max
net.core.wmem_max = 124928
บางค่าที่ทาง Oracle Database ต้องการ ต่ำกว่าค่าดีฟอลต์ที่มีอยู่แล้ว ก็อาจจะข้ามไม่เซ็ตค่าใหม่ได้ เช่นค่า kernel.shmall (ใส่เครื่องหมาย # ไว้หน้าบรรทัด)
เพื่อให้มีผล หากมีการรีสตาร์ตเครื่องได้ด้วย แนะนำให้แก้ไขไฟล์ /etc/sysctl.conf โดยเพิ่มบรรทัดคอนฟิกต่างๆ ดังนี้
[root@cent6-oracle11g2 ~]# vi /etc/sysctl.conf
..
# Minimum values for Oracle
fs.aio-max-nr = 1048576
fs.file-max = 6815744
#kernel.shmall = 2097152
#kernel.shmmax = 536870912
#kernel.shmmni = 4096
kernel.sem = 250 32000 100 128
net.ipv4.ip_local_port_range = 9000 65500
net.core.rmem_default = 262144
net.core.rmem_max = 4194304
net.core.wmem_default = 262144
net.core.wmem_max = 1048576
รันคำสั่ง sysctl -p เพื่อให้คอนฟิกของ kernel ใหม่มีผล
[root@cent6-oracle11g2 ~]# sysctl -p
net.ipv4.ip_forward = 0
net.ipv4.conf.default.rp_filter = 1
net.ipv4.conf.default.accept_source_route = 0
kernel.sysrq = 0
kernel.core_uses_pid = 1
net.ipv4.tcp_syncookies = 1
kernel.msgmnb = 65536
kernel.msgmax = 65536
kernel.shmmax = 68719476736
kernel.shmall = 4294967296
fs.aio-max-nr = 1048576
fs.file-max = 6815744
kernel.sem = 250 32000 100 128
net.ipv4.ip_local_port_range = 9000 65500
net.core.rmem_default = 262144
net.core.rmem_max = 4194304
net.core.wmem_default = 262144
net.core.wmem_max = 1048576
แก้ไขค่าคอนฟิก Resource Limits
ดีฟอลต์จากการติดตั้ง CentOS 6.5
[oracle@cent6-oracle11g2 ~]$ ulimit -Sn
1024
[oracle@cent6-oracle11g2 ~]$ ulimit -Hn
4096

[oracle@cent6-oracle11g2 ~]$ ulimit -Su
1024
[oracle@cent6-oracle11g2 ~]$ ulimit -Hu
15889

[oracle@cent6-oracle11g2 ~]$ ulimit -Ss
10240
[oracle@cent6-oracle11g2 ~]$ ulimit -Hs
unlimited
แก้ไขไฟล์ /etc/security/limits.conf
[root@cent6-oracle11g2 ~]# vi /etc/security/limits.conf
...
# Minimum values for Oracle
# -------------------------
# nofile : Open file descriptors
#  - soft = 1024
#  - hard = 65536
#
# nproc : Number of processes available to a single user
#  - soft = 2047
#  - hard = 16384
#
# stack : Size of the stack segment of the process
#  - soft = 10240
#  - hard = 10240
#
oracle          soft    nofile          1024
oracle          hard    nofile          65536
oracle          soft    nproc           2047
oracle          hard    nproc           16384
oracle          soft    stack           10240
เริ่มติดตั้ง Oracle Database
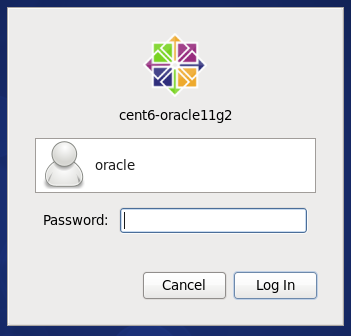
การติดตั้ง Oracle 11g2 ต้องติดตั้งบน X Window
ล็อกอินด้วย oracle บน X Window (Desktop)
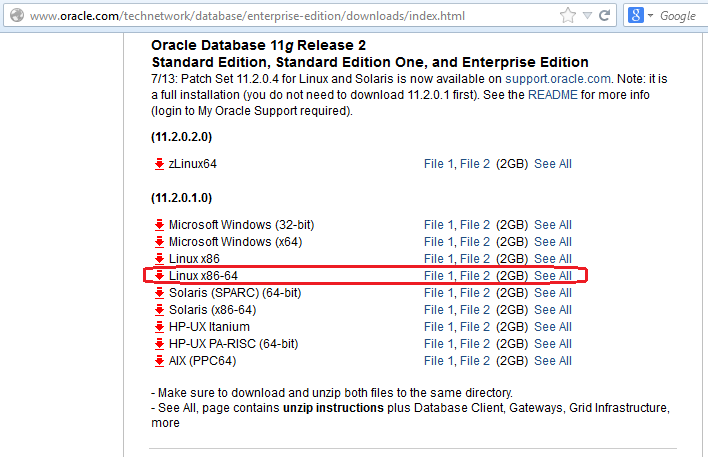
ดาวน์โหลดไฟล์ติดตั้งจากเว็บ Oracle Database Software Downloads
เลือกดาวน์โหลดเวอร์ชั่น Oracle Database 11g Release 2 สำหรับ Linux x86-64
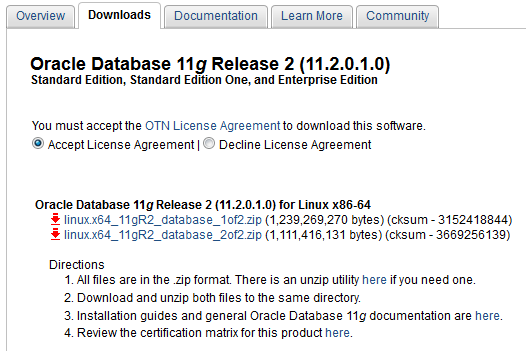
ตัวอย่างการดาวน์โหลดแล้วเซฟไฟล์ไว้ใน /tmp
[root@cent6-oracle11g2 tmp]# ls -l
 total 2295600
 -rw-r--r--. 1 root root 1239269270 Apr 13 11:07 linux.x64_11gR2_database_1of2.zip
 -rw-r--r--. 1 root root 1111416131 Apr 13 11:12 linux.x64_11gR2_database_2of2.zip
คำแนะนำ เนื่องจากไฟล์มีขนาดใหญ่มาก แนะนำให้ตรวจสอบความถูกต้องของไฟล์ว่าดาวน์โหลดมาครบถ้วนหรือไม่ ด้วยการใช้คำสั่ง cksum
เปรียบเทียบผลที่แสดงบนหน้าเว็บ (คลิ้กที่ลิ้งค์ See All จากหน้า Download)
หากผลที่ได้ตรงกัน ขั้นต่อไป ใช้คำสั่ง unzip เพื่อแตกไฟล์ zip ทั้งสองไฟล์
[root@cent6-oracle11g2 tmp]# unzip linux.x64_11gR2_database_1of2.zip
[root@cent6-oracle11g2 tmp]# unzip linux.x64_11gR2_database_2of2.zip
[root@cent6-oracle11g2 tmp]# ls -l
total 2295604
drwxr-xr-x. 8 root root       4096 Aug 21  2009 database
-rw-r--r--. 1 root root 1239269270 Apr 13 11:07 linux.x64_11gR2_database_1of2.zip
-rw-r--r--. 1 root root 1111416131 Apr 13 11:12 linux.x64_11gR2_database_2of2.zip
ไฟล์ที่ได้จากการ unzip
[root@cent6-oracle11g2 tmp]# ls -l database/
total 36
drwxr-xr-x. 12 root root 4096 Aug 17  2009 doc
drwxr-xr-x.  4 root root 4096 Aug 15  2009 install
drwxrwxr-x.  2 root root 4096 Aug 15  2009 response
drwxr-xr-x.  2 root root 4096 Aug 15  2009 rpm
-rwxr-xr-x.  1 root root 3226 Aug 15  2009 runInstaller
drwxrwxr-x.  2 root root 4096 Aug 15  2009 sshsetup
drwxr-xr-x. 14 root root 4096 Aug 15  2009 stage
-rw-r--r--.  1 root root 5402 Aug 18  2009 welcome.html
ขนาดไฟล์ unzip
[root@cent6-oracle11g2 tmp]# du -sh database/
2.4G    database/
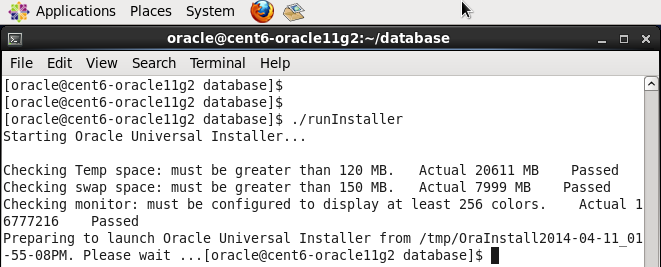
cd เข้าไปในไดเร็คทอรีที่ unzip ไว้ แล้วรัน ./runInstaller
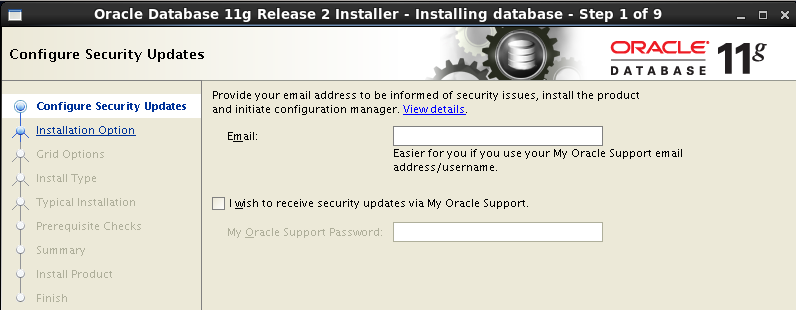
หน้า Configure Security Updates กรอกข้อมูลหากต้องการรับอีมเล์ข่าวสารจาก Oracle
หน้า Select Installation Option เลือก Create and configure a database

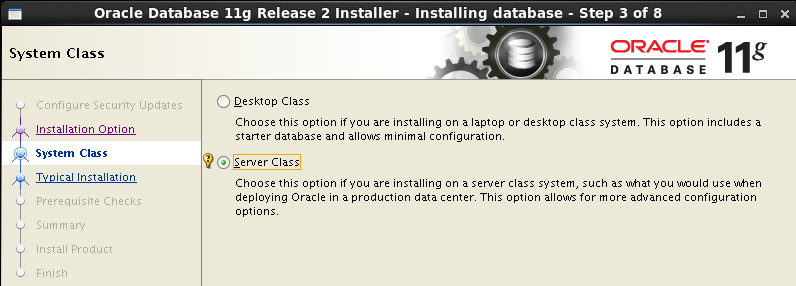
หน้า System Class เลือก Server Class
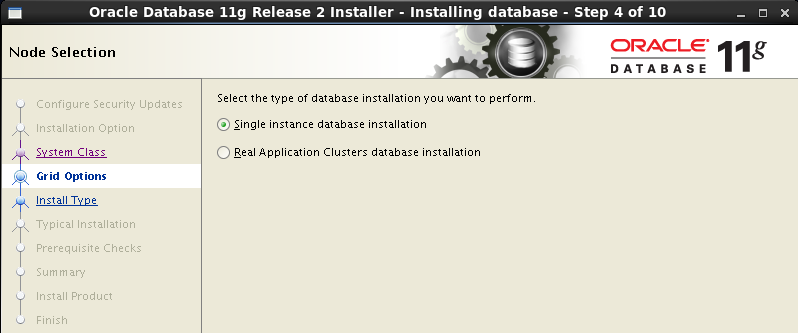
หน้า Node Selection เลือก Single Instance database installation
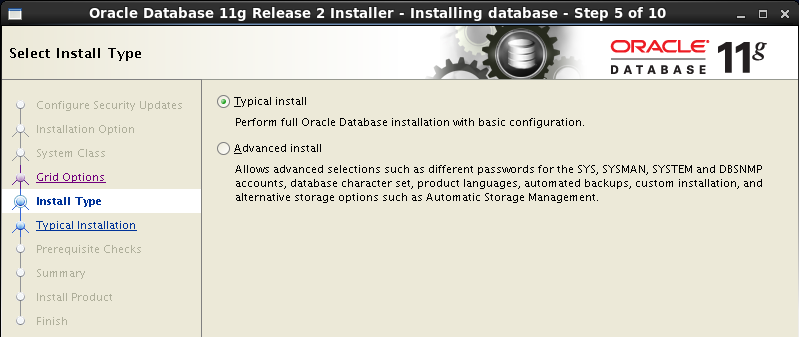
หน้า Select Install Type เลือก Typical install
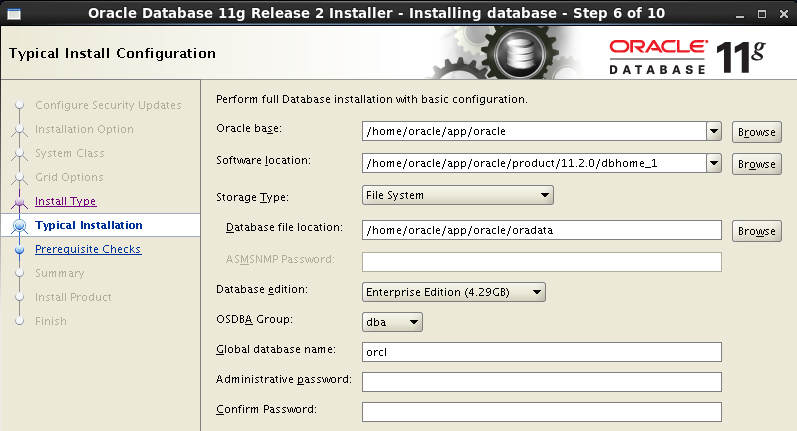
หน้า Typical Install Configuration แสดงรายละเอียดที่จะติดตั้ง Oracle Database บนเครื่อง เช่นไดเร็คทอรีต่างๆ
กรอก Admin Password สองครั้งในช่อง Administrative password และ Confirm Password
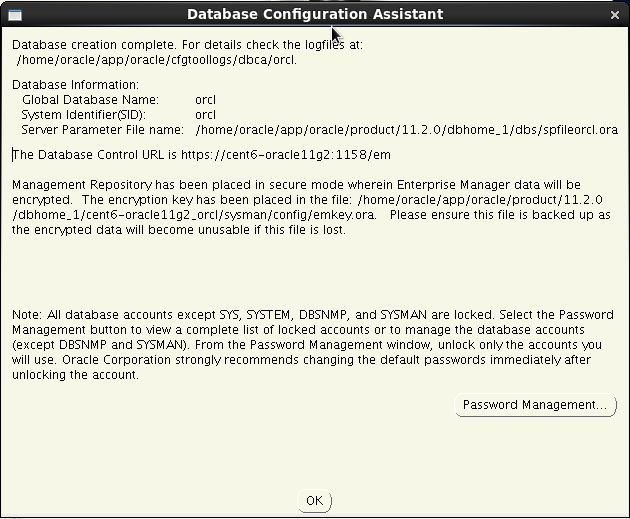
ดีฟอลต์การติดตั้ง Global database name คือ orcl
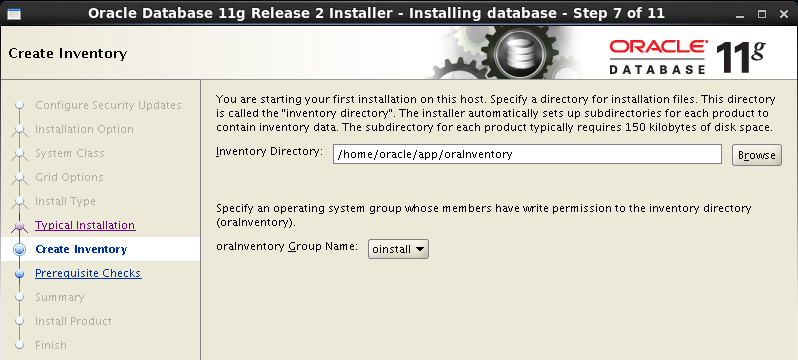
หน้า Create Inventory แสดงชื่อ Inventory Directory
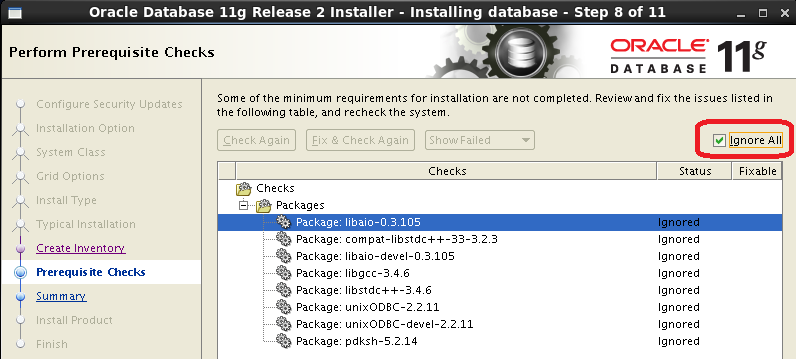
หน้า Perform Prerequisite Checks แสดงค่าคอนฟิกของเครื่องขั้นต่ำ (minimum requirement) ที่จำเป็นต่อการติดตั้ง
แม้หน้าจอจะฟ้องให้ติดตั้ง i386 แต่ ใน CentOS ไม่มีไฟล์แบบ i386 ให้ติดตั้งเวอร์ชั่น i686 แทน แล้วคลิ้กเลือก [x] ignore all แล้วกดปุ่ม Next ต่อไปได้
หน้า Summary สรุปค่าคอนฟิกทั้งหมดก่อนการติดตั้ง

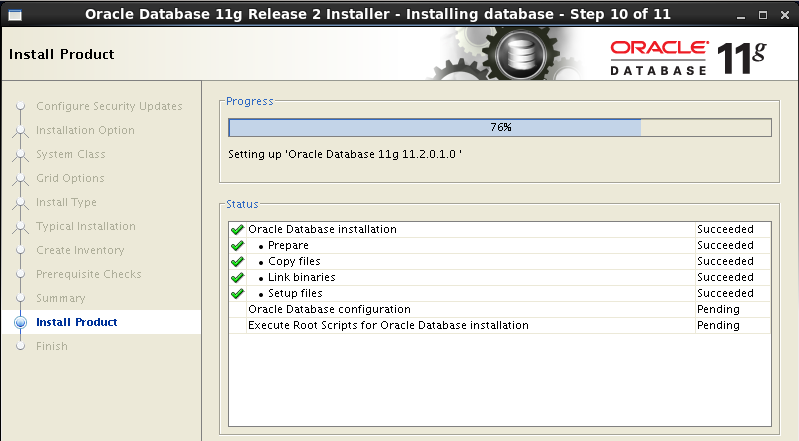
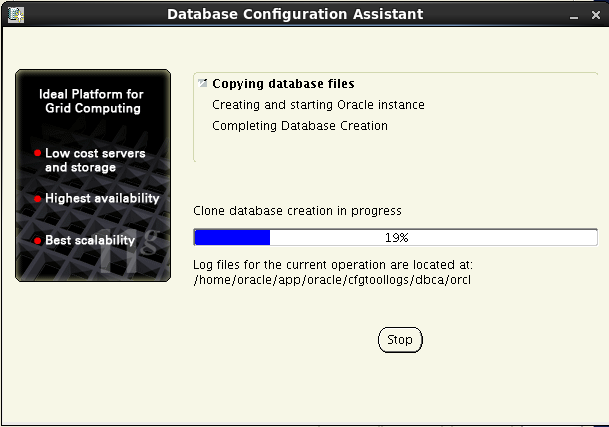
หน้าจอระหว่างการติดตั้ง
เมื่อใกล้สิ้นสุด จะมีหน้าจอ Execute Configuration scripts แจ้งให้รันสคริปต์สองไฟล์
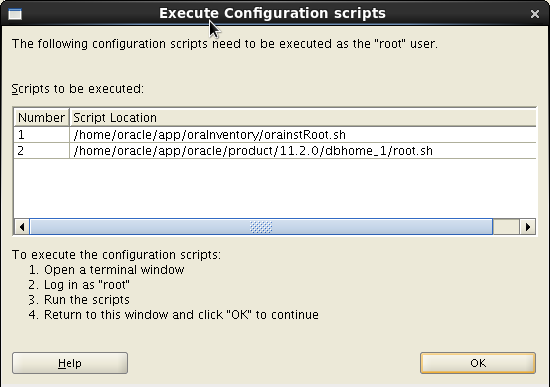
ล็อกอินด้วย root แล้วรันสองไฟล์ตามที่แสดง
[root@cent6-oracle11g2 ~]# /home/oracle/app/oraInventory/orainstRoot.sh
Changing permissions of /home/oracle/app/oraInventory.
Adding read,write permissions for group.
Removing read,write,execute permissions for world.
Changing groupname of /home/oracle/app/oraInventory to oinstall.
The execution of the script is complete.
[root@cent6-oracle11g2 ~]# /home/oracle/app/oracle/product/11.2.0/dbhome_1/root.sh
Running Oracle 11g root.sh script...
The following environment variables are set as:
ORACLE_OWNER= oracle
ORACLE_HOME=  /home/oracle/app/oracle/product/11.2.0/dbhome_1
Enter the full pathname of the local bin directory: [/usr/local/bin]:
Copying dbhome to /usr/local/bin ...
Copying oraenv to /usr/local/bin ...
Copying coraenv to /usr/local/bin ...
Creating /etc/oratab file...
Entries will be added to the /etc/oratab file as needed by
Database Configuration Assistant when a database is created
Finished running generic part of root.sh script.
Now product-specific root actions will be performed.
Finished product-specific root actions.
หน้าจอ Finish แสดงการติดตั้งเสร็จสิ้น พร้อมแสดงที่อยู่ของหน้าเว็บ Enterprise Manager Database Control ที่เราสามารถเข้าไปจัดการ Oracle Database ด้วย browser ผ่านหน้าเว็บได้

ดีฟอลต์ไฟล์ที่ติดตั้งทั้งหมดจะอยู่ในไดเร็คทอรี app/ ใน home ของ oracle
ขนาดดิสก์ที่ใช้ในการติดตั้งประมาณ 5.5 GB
[oracle@cent6-oracle11g2 ~]$ du -sh app
5.5G    app
ข้อมูลอ้างอิง
- Oracle Database 11g Release 2 (11.2) Installation On Oracle Linux 6
- Deploying Oracle Database 11g R2 on Red Hat Enterprise Linux 6 – Best Practices
- Installing Oracle 11g Release 2 Enterprise Edition on Red Hat Enterprise Linux 6.2 (x86_64) within 60 minutes
- Oracle Database Online Doucmentation 11g Release 2 (11.2)
- วิธีเปิด ปิด Oracle Database 11g
- การใช้ Oracle SQL Plus เบื้องต้น เพื่อคิวรี่ข้อมูล