หลังจากที่ คอนฟิก IPv6 บน CentOS 6 แล้ว ลองมาดูวิธีคอนฟิกเซิร์ฟเวอร์ DHCPv6 Server เพื่อแจก IPv6 Address ให้กับเครื่องไคลเอนต์อื่นๆ เช่น Windows สามารถรับ IPv6 Address ได้โดยอัตโนมัติ
โดยจะทดสอบติดตั้งและคอนฟิกบน CentOS 6
หากยังไม่ได้ติดตั้ง ใช้คำสั่ง yum ติดตั้งแพ็คเกจ dhcp
[root@cent6-ipv6 ~]# yum install dhcp
...

Installed:
  dhcp.x86_64 12:4.1.1-43.P1.el6.centos

Dependency Installed:
  portreserve.x86_64 0:0.0.4-9.el6

Complete!
ไฟล์คอนฟิกของ dhcp จะอยู่ในไดเร็กทอรี /etc/dhcp/
ตัวอย่างไฟล์คอนฟิกที่ติดตั้งมาโดยดีฟอลต์
[root@cent6-ipv6 ~]# cd /etc/dhcp/
[root@cent6-ipv6 dhcp]# ls -l
total 12
drwxr-xr-x. 2 root root 4096 Oct 16 21:42 dhclient.d
-rw-r--r--. 1 root root  193 Oct 16 21:42 dhcpd6.conf
-rw-r--r--. 1 root root  112 Oct 16 21:42 dhcpd.conf
แพ็คเกจ dhcp ที่ติดตั้ง จะสามารถทำหน้าที่เซิร์ฟเวอร์ DHCP ได้ทั้ง IPv4 และ IPv6 Address
ไฟล์คอนฟิก dhcpd.conf สำหรับแจก IPv4 Address
[root@cent6-ipv6 dhcp]# cat dhcpd.conf
#
# DHCP Server Configuration file.
#   see /usr/share/doc/dhcp*/dhcpd.conf.sample
#   see 'man 5 dhcpd.conf'
#
ไฟล์คอนฟิก dhcpd6.conf สำหรับแจก IPv6 Address
[root@cent6-ipv6 dhcp]# cat dhcpd6.conf
#
# DHCP for IPv6 Server Configuration file.
#   see /usr/share/doc/dhcp*/dhcpd6.conf.sample
#   see 'man 5 dhcpd.conf'
#   run 'service dhcpd6 start' or 'dhcpd -6 -cf /etc/dhcp/dhcpd6.conf'
#
ตัวอย่างไฟล์คอนฟิกสามารถดูได้ที่ไดเร็กทอรี /usr/share/doc/dhcp*/
[root@cent6-ipv6 dhcp]# ls -l /usr/share/doc/dhcp-4.1.1/
total 132
-rw-r--r--. 1 root root  2743 Apr 19  2001 3.0b1-lease-convert
-rw-r--r--. 1 root root 18501 Sep 10  1999 api+protocol
-rw-r--r--. 1 root root  5085 Apr 28  2007 dhclient-tz-exithook.sh
-rw-r--r--. 1 root root  3309 Oct 16 21:42 dhcpd6.conf.sample
-rw-r--r--. 1 root root  3262 Aug 13  2002 dhcpd.conf.sample
-rw-r--r--. 1 root root 17380 Jul  7  2009 dhcpd-conf-to-ldap
-rw-r--r--. 1 root root 41765 Jul  7  2009 draft-ietf-dhc-ldap-schema-01.txt
-rw-r--r--. 1 root root  5591 Mar 29  1997 IANA-arp-parameters
drwxr-xr-x. 2 root root  4096 Dec 27 23:29 ms2isc
-rw-r--r--. 1 root root  8062 Feb 14  2010 README.ldap
-rw-r--r--. 1 root root   899 Oct  5  1999 sethostname.sh
-rw-r--r--. 1 root root   426 Oct  5  1999 solaris.init
ในที่นี้เราจะสนใจไฟล์ dhcpd6.conf สำหรับแจก IPv6 Address โดยอัตโนมัติ
ตัวอย่างคอนฟิก IP พอร์ต eth0 ของเซิร์ฟเวอร์
[root@cent6-ipv6 ~]# ifconfig eth0
eth0      Link encap:Ethernet  HWaddr 08:00:27:7A:55:88
          inet addr:192.168.1.10  Bcast:192.168.1.255  Mask:255.255.255.0
          inet6 addr: 2001:db8:a:b::1/64 Scope:Global
          inet6 addr: fe80::a00:27ff:fe7a:5588/64 Scope:Link
          UP BROADCAST RUNNING MULTICAST  MTU:1500  Metric:1
          RX packets:691 errors:0 dropped:0 overruns:0 frame:0
          TX packets:21 errors:0 dropped:0 overruns:0 carrier:0
          collisions:0 txqueuelen:1000
          RX bytes:63618 (62.1 KiB)  TX bytes:1930 (1.8 KiB)
ตัวอย่างไฟล์คอนฟิก dhcpd6.conf แบบสั้นที่สุด เพื่อแจก IPv6 Address ใน subnet 2001:db8:a:b::/64 โดยกำหนดช่วง (range) ตัวเลขจาก 129 ถึง 254
[root@cent6-ipv6 ~]# vi /etc/dhcp/dhcpd6.conf
#
# DHCP for IPv6 Server Configuration file.
#   see /usr/share/doc/dhcp*/dhcpd6.conf.sample
#   see 'man 5 dhcpd.conf'
#   run 'service dhcpd6 start' or 'dhcpd -6 -cf /etc/dhcp/dhcpd6.conf'
#

subnet6 2001:db8:a:b::/64 {
    range6 2001:db8:a:b::129 2001:db8:a:b::254;
}
ใช้คำสั่ง service เพื่อรันเซอร์วิส dhcpd6
[root@cent6-ipv6 ~]# service dhcpd6 start
Starting dhcpd (DHCPv6):                                   [  OK  ]
คำเตือน ระวังความสับสน คอนฟิกที่เกี่ยวกับ IPv6 จะมีเลข 6 ตามหลังด้วย ไม่ว่าจะเป็นชื่อไฟล์คอนฟิก ออปชั่นที่อยู่ในไฟล์ ชื่อเซอร์วิส
เวลาแก้ไขคอนฟิกและทดสอบการรัน dhcpd6 แนะนำให้เปิดหน้าจอรันคำสั่ง tail -f ไฟล์ /var/log/messages ไปด้วย เพราะไฟล์นี้จะแสดงข้อความสำคัญในการรัน หรือแสดงข้อผิดพลาดที่เกิดขึ้นจากการคอนฟิกได้
ตัวอย่างข้อความที่เกิดขึ้นในไฟล์ /var/log/messages
[root@cent6-ipv6 ~]# tail -f /var/log/messages
Dec 30 21:05:19 cent6-ipv6 dhcpd: Internet Systems Consortium DHCP Server 4.1.1-P1
Dec 30 21:05:19 cent6-ipv6 dhcpd: Copyright 2004-2010 Internet Systems Consortium.
Dec 30 21:05:19 cent6-ipv6 dhcpd: All rights reserved.
Dec 30 21:05:19 cent6-ipv6 dhcpd: For info, please visit https://www.isc.org/software/dhcp/
Dec 30 21:05:19 cent6-ipv6 dhcpd: Not searching LDAP since ldap-server, ldap-port and ldap-base-dn were not specified in the config file
Dec 30 21:05:19 cent6-ipv6 dhcpd: Wrote 0 leases to leases file.
Dec 30 21:05:19 cent6-ipv6 dhcpd: Bound to *:547
Dec 30 21:05:19 cent6-ipv6 dhcpd: Listening on Socket/5/eth0/2001:db8:a:b::/64
Dec 30 21:05:19 cent6-ipv6 dhcpd: Sending on   Socket/5/eth0/2001:db8:a:b::/64
ทดลองใช้ Windows 7 ทำหน้าที่เป็น DHCP Client เพื่อรับ IPv6
คลิ้กขวาที่ไอคอน Local Area Connection เลือก Properties
คลิ้กเพื่อเลือก Internet Protocol Version 6 (TCP/IPv6) แล้วกดปุ่ม Properties
ใน Properties คลิ้กเพื่อเลือก
[x] Obtain an IPv6 address automatically
[x] Obtain DNS server address automatically
ลองดึงสายออกจากพอร์ตแลนของเครื่อง Windows 7 หรือคลิ้กขวาที่ไอคอน Local Area Connecton เลือก Disable แล้ว คลิ้กเพื่อ Enable อีกครั้ง เพื่อให้รับ IPv6 จาก DHCP Server
รอสักพักแล้วคลิ้กขวาที่ไอคอน Local Area Connecton อีกครั้ง เลือก Status แล้วกดปุ่ม Details เพื่อดู IPv6 ที่ได้รับมา
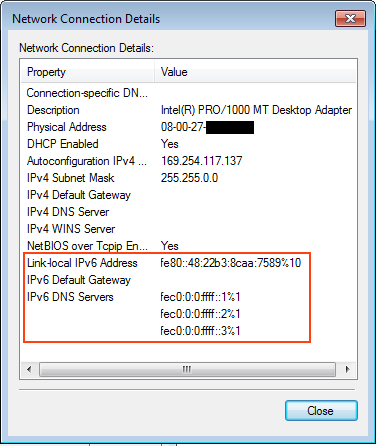
ในบรรทัดที่เขียน IPv6 Address จะมีแค่ Link-local อยู่ ยังไม่ได้รับ IPv6 จากเครื่อง DHCP Server มา
ถ้าดูในหน้าจอที่ tail -f /var/log/messages ก็ไม่มีข้อความอะไรแสดงขึ้นมา
สาเหตุเป็นเพราะว่า ดีฟอลต์การติดตั้ง CentOS 6 (รวมทั้ง Red Hat Enterprise 6) จะมีเซอร์วิส ip6tables (iptables สำหรับ IPv6) ติดตั้งและถูกคอนฟิกให้เปิดเฉพาะ ICMP และ SSH เท่านั้น
ต้องเปิดพอร์ตเพิ่มเติมให้ให้ใช้ DHCPv6 server ได้
แก้ไขไฟล์คอนฟิก ip6tables เพื่ออนุญาตการใช้พอร์ต DHCPv6 Server (พอร์ต UDP 547)
[root@cent6-ipv6 ~]# vi /etc/sysconfig/ip6tables
# Firewall configuration written by system-config-firewall
# Manual customization of this file is not recommended.
*filter
:INPUT ACCEPT [0:0]
:FORWARD ACCEPT [0:0]
:OUTPUT ACCEPT [0:0]
-A INPUT -m state --state ESTABLISHED,RELATED -j ACCEPT
-A INPUT -p ipv6-icmp -j ACCEPT
-A INPUT -i lo -j ACCEPT
-A INPUT -m state --state NEW -m tcp -p tcp --dport 22 -j ACCEPT
-A INPUT -m state --state NEW -m udp -p udp --dport 547 -j ACCEPT
-A INPUT -j REJECT --reject-with icmp6-adm-prohibited
-A FORWARD -j REJECT --reject-with icmp6-adm-prohibited
COMMIT
ใช้คำสั่ง service เพื่อรีสตาร์ตเซอร์วิส ip6tables เพื่อให้คอนฟิกที่แก้ไขมีผล
[root@cent6-ipv6 ~]# service ip6tables restart
ip6tables: Setting chains to policy ACCEPT: filter         [  OK  ]
ip6tables: Flushing firewall rules:                        [  OK  ]
ip6tables: Unloading modules:                              [  OK  ]
ip6tables: Applying firewall rules:                        [  OK  ]
คำเตือน อีกครั้งหนึี่ง ระวังต้องมีเลข 6 ถึงจะเป็นเซอร์วิส iptables สำหรับ IPv6
[root@cent6-ipv6 ~]# tail -f /var/log/messages
Dec 31 10:59:09 cent6-ipv6 dhcpd: Solicit message from fe80::48:22b3:8caa:7589 port 546, transaction ID 0xA9528200
Dec 31 10:59:09 cent6-ipv6 dhcpd: Sending Advertise to fe80::48:22b3:8caa:7589 port 546
Dec 31 10:59:09 cent6-ipv6 dhcpd: Request message from fe80::48:22b3:8caa:7589 port 546, transaction ID 0xA9528200
Dec 31 10:59:09 cent6-ipv6 dhcpd: Sending Reply to fe80::48:22b3:8caa:7589 port 546
ดูรายละเอียดการแจก IPv6 ได้ในไฟล์ /var/lib/dhcpd/dhcpd6.leases
[root@cent6-ipv6 ~]# tail -f /var/lib/dhcpd/dhcpd6.leases
ia-na "'\000\010\016\000\001\000\001\034\036\323\317\010\000'1!\315" {
  cltt 3 2014/12/31 03:59:09;
  iaaddr 2001:db8:a:b::254 {
    binding state active;
    preferred-life 27000;
    max-life 43200;
    ends 3 2014/12/31 15:59:09;
  }
}
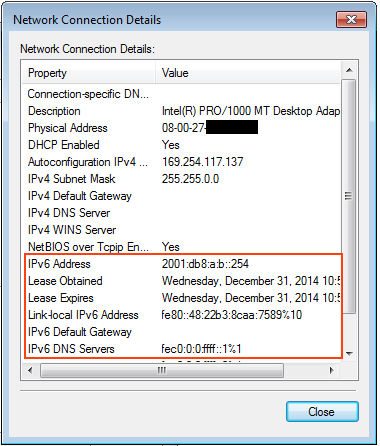
ตัวอย่าง IPv6 ที่ได้บน Windows 7
คอนฟิกเซิร์ฟเวอร์ตอนนี้แจกเฉพาะ IPv6 Address ยังไม่ได้คอนฟิกเพื่อแจก IPv6 Default Gateway และ IPv6 DNS Servers
เปิดหน้าจอ cmd
ใช้คำสั่ง ipconfig เพื่อดูคอนฟิก IP ที่ได้
C:\Users\admin>ipconfig

Windows IP Configuration


Ethernet adapter Local Area Connection:

   Connection-specific DNS Suffix  . :
   IPv6 Address. . . . . . . . . . . : 2001:db8:a:b::254
   Link-local IPv6 Address . . . . . : fe80::48:22b3:8caa:7589%10
   Autoconfiguration IPv4 Address. . : 169.254.117.137
   Subnet Mask . . . . . . . . . . . : 255.255.0.0
   Default Gateway . . . . . . . . . :
ลองใช้คำสั่ง ping ทดสอบกับ IPv6 ที่ได้รับแจกมา
C:\Users\admin>ping 2001:db8:a:b::254

Pinging 2001:db8:a:b::254 with 32 bytes of data:
Reply from 2001:db8:a:b::254: time<1ms
Reply from 2001:db8:a:b::254: time<1ms
Reply from 2001:db8:a:b::254: time<1ms
Reply from 2001:db8:a:b::254: time<1ms

Ping statistics for 2001:db8:a:b::254:
 Packets: Sent = 4, Received = 4, Lost = 0 (0% loss),
Approximate round trip times in milli-seconds:
 Minimum = 0ms, Maximum = 0ms, Average = 0ms
ทดสอบ ping กับ IPv6 ของเซิร์ฟเวอร์ DHCP
C:\Users\admin>ping 2001:db8:a:b::1

Pinging 2001:db8:a:b::1 with 32 bytes of data:
PING: transmit failed. General failure.
PING: transmit failed. General failure.
PING: transmit failed. General failure.
PING: transmit failed. General failure.

Ping statistics for 2001:db8:a:b::1:
    Packets: Sent = 4, Received = 0, Lost = 4 (100% loss),
ลอง ping แบบระบุออปชั่น -6 เพื่อบังคับให้ใช้ IPv6 เท่านั้น ก็ยังไม่สามารถ ping ได้
C:\Users\admin>ping -6 2001:db8:a:b::1

Pinging 2001:db8:a:b::1 with 32 bytes of data:
PING: transmit failed. General failure.
PING: transmit failed. General failure.
PING: transmit failed. General failure.
PING: transmit failed. General failure.

Ping statistics for 2001:db8:a:b::1:
    Packets: Sent = 4, Received = 0, Lost = 4 (100% loss),
สาเหตุเป็นเพราะเซิร์ฟเวอร์ DHCPv6 นั้น แจกมาเฉพาะข้อมูล IPv6 Address เท่านั้น ไม่ได้แจกข้อมูล router มาด้วย
C:\Users\admin>netsh interface ipv6 show route

Publish  Type      Met  Prefix                    Idx  Gateway/Interface Name
-------  --------  ---  ------------------------  ---  ------------------------
No       Manual    256  ::1/128                     1  Loopback Pseudo-Interface 1
No       Manual    256  2001:db8:a:b::254/128      10  Local Area Connection
No       Manual    256  fe80::/64                  15  Teredo Tunneling Pseudo-Interface
No       Manual    256  fe80::/64                  10  Local Area Connection
No       Manual    256  fe80::100:7f:fffe/128      15  Teredo Tunneling Pseudo-Interface
No       Manual    256  fe80::5efe:169.254.117.137/128   12  isatap.{767AE593-2DBE-4796-ADDB-0DAABF551592}
No       Manual    256  fe80::48:22b3:8caa:7589/128   10  Local Area Connection
No       Manual    256  ff00::/8                    1  Loopback Pseudo-Interface 1
No       Manual    256  ff00::/8                   15  Teredo Tunneling Pseudo-Interface
No       Manual    256  ff00::/8                   10  Local Area Connection
ต้อง ติดตั้งและคอนฟิก radvd เพื่อแจกข้อมูล IPv6 Router เพิ่มเติม ซึ่งจะขอกล่าวถึงในบทความต่อไป
ตัวอย่างคอนฟิกเพิ่มเติมเพื่อแจกข้อมูล DNS Server และ Domain Suffix
[root@cent6-ipv6 ~]# vi /etc/dhcp/dhcpd6.conf
...
option dhcp6.name-servers 2001:db8:a:b::2;
option dhcp6.domain-search "example.com";

subnet6 2001:db8:a:b::/64 {
    range6 2001:db8:a:b::129 2001:db8:a:b::254;
}
อย่าลืมรีสตาร์ตเซอร์วิส dhcp หลังจากแก้ไขไฟล์
ข้อมูลอ้างอิง


