ความเห็นส่วนตัว DNS Server จัดว่าเป็นโปรแกรมหรือเซอร์วิสที่อยู่เบื้องหลังความสำเร็จของอินเตอร์เน็ตอย่างหนึ่ง คือแทนที่ผู้ใช้จะต้องจำและระบุ IP Address ในการเรียกใช้บริการเซิร์ฟเวอร์เครื่องอื่นๆ ผู้ใช้ก็สามารถใช้ชื่อแทนได้ เช่นแค่ระบุชื่อ www.google.com ก็สามารถเข้าสู่เว็บไซต์ของ google ได้ แทนที่ต้องระบุ IP Address เครื่องเซิร์ฟเวอร์ของ google ซึ่งมีอยู่มากมาย และอาจมีการเปลี่ยนแปลงได้ตลอดเวลา
เรามาลองดูวิธีการติดตั้งและคอนฟิก DNS กัน ผู้เขียนขอเลือกใช้ BIND ซึ่งถือว่าเป็นโปรแกรม DNS Server ที่มีการใช้งานกันมากที่สุดบนโลกอินเตอร์เน็ตนี้ และรองรับคุณสมบัติมาตรฐานของ DNS Server โดยจะทดสอบการติดตั้งบน CentOS 6
ตอนแรกเราจะเริ่มติดตั้ง BIND และคอนฟิกเป็น caching only ความหมายคือ คอนฟิกให้ทำหน้าที่เป็น DNS เซิร์ฟเวอร์ที่ให้บริการเครื่องไคลเอ้นต์ในการถามชื่อแล้วตอบเป็น IP Address ให้ โดยเซิร์ฟเวอร์ที่ทำหน้าที่ caching only นี้ จะทำหน้าที่ไปค้นหาข้อมูล (recursion) โดยการถาม DNS เซิร์ฟเวอร์ตัวอื่นๆ ที่อยู่บนอินเตอร์เน็ต จนกว่าจะได้คำตอบว่า ชื่อที่ไคลเอ้นต์ถามมา มี IP Address เป็นอะไร
ที่จริงแล้ว โมเดมหรือเร้าเตอร์ (ADSL) ที่ใช้งานตามบ้าน สำนักงาน หรือองค์กรทั่วไป ก็สามารถทำหน้าที่เป็น DNS caching only ได้อยู่แล้ว ไม่จำเป็นต้องติดตั้งเซิรฟ์เวอร์เพิ่มแต่อย่างใด แต่ถ้าคุณมีแผนการตั้งเซิร์ฟเวอร์อื่นๆ ภายในองค์กรของคุณ เช่น เว็บ เมล์ แชร์ไฟล์ เป็นต้น จำเป็นต้องมีข้อมูลการแปลงชื่อเป็น ip ของคุณเอง แนะนำให้เริ่มต้นตั้งเซิร์ฟเวอร์ DNS ของคุณขึ้นมาเอง
ติดตั้ง BIND DNS Server
ใช้คำสั่ง rpm -qa แล้วดูเฉพาะบรรทัดที่มีคำว่า bind
[root@cent6 ~]# rpm -qa | grep bind
bind-utils-9.8.2-0.10.rc1.el6.x86_64
bind-libs-9.8.2-0.10.rc1.el6.x86_64
bind จะถูกติดตั้งแยกออกเป็นแพ็กเกจย่อยๆ หากไม่ได้เลือกติดตั้งเป็นพิเศษ จะมี bind-utils ซึ่งเป็นแพ็กเกจ rpm ที่ติดตั้งโปรแกรมประเภท DNS client เช่น host, dig, nslookup และ bind-libs ประกอบด้วยไฟล์ library ใช้สำหรับรันโปรแกรมต่างๆ ของ bind
หมายเหตุ เราสามารถใช้คำสั่ง rpm -qil ตามด้วยชื่อ rpm แพ็กเกจ เพื่อดูไฟล์ที่ถูกติดตั้งได้
[root@cent6 ~]# rpm -ql bind-utils
/usr/bin/dig
/usr/bin/host
/usr/bin/nslookup
/usr/bin/nsupdate
/usr/share/man/man1/dig.1.gz
/usr/share/man/man1/host.1.gz
/usr/share/man/man1/nslookup.1.gz
/usr/share/man/man1/nsupdate.1.gz
หากต้องการติดตั้ง BIND DNS Server ต้องติดตั้งแพ็กเกจที่ชื่อว่า bind (ไม่มีอะไรต่อท้าย)
[root@cent6 ~]# yum install bind
Loaded plugins: fastestmirror, security
Loading mirror speeds from cached hostfile
* base: mirrors.thzhost.com
* extras: mirrors.thzhost.com
* updates: mirrors.thzhost.com
...
Transaction Summary
=========================================================================================================================================
Install 2 Package(s)
Upgrade 2 Package(s)
Total download size: 5.0 M
Is this ok [y/N]: y
...
Installed:
bind.x86_64 32:9.8.2-0.10.rc1.el6_3.6
Dependency Installed:
portreserve.x86_64 0:0.0.4-9.el6
Dependency Updated:
bind-libs.x86_64 32:9.8.2-0.10.rc1.el6_3.6   bind-utils.x86_64 32:9.8.2-0.10.rc1.el6_3.6
Complete!
[root@cent6 ~]#
หมายเหตุ เนื่องจากมีการปรับปรุงเวอร์ชั่นด้วย ทำให้ต้องมีการ update แพ็กเกจอื่นๆ ที่เกี่ยวข้องด้วย โปรแกรม yum จะจัดการให้โดยอัตโนมัติ
ชื่อเซอร์วิสของ BIND DNS Server คือ named ใช้คำสั่ง named เพื่อรันเซอร์วิส DNS ขึ้นมา
[root@cent6 ~]# service named start
Generating /etc/rndc.key:          [ OK ]
Starting named:                    [ OK ]
หมายเหตุ ในครั้งแรกของการรันเซอร์วิส named จะมีการสร้างคีย์ไฟล์ขึ้นมาด้วย ยังไม่ขออธิบายในที่นี้
ใช้คำสั่ง ps เพื่อดูโปรเซสของ named
[root@cent6 ~]# ps -ef | grep named
named  3091    1    0    15:00    ?    00:00:00 /usr/sbin/named -u named
ใช้คำสั่ง nslookup เพื่อทดสอบการแปลงชื่อเป็น ip
การใช้คำสั่ง nslookup
- พิมพ์คำสั่ง server 127.0.0.1 เพื่อระบุว่าต้องการถามชื่อจาก DNS ที่รันอยู่บนเครื่องเดียวกัน (127.0.0.1)
- ใส่ชื่อที่ต้องการแปลงเป็น ip ถ้าคอนฟิก DNS ถูกต้อง ผลลัพธ์จะแสดง IP Address ของชื่อที่ถาม
- พิมพ์ exit เพื่อออกจากคำสั่ง nslookup
ตัวอย่างการใช้ nslookup
[root@cent6 ~]# nslookup
> server 127.0.0.1
Default server: 127.0.0.1
Address: 127.0.0.1#53
> www.google.com
Server: 127.0.0.1
Address: 127.0.0.1#53
Non-authoritative answer:
Name: www.google.com
Address: 74.125.135.147
Name: www.google.com
Address: 74.125.135.105
Name: www.google.com
Address: 74.125.135.106
Name: www.google.com
Address: 74.125.135.99
Name: www.google.com
Address: 74.125.135.103
Name: www.google.com
Address: 74.125.135.104
> exit
[root@cent6 ~]#
หรืออาจจะใช้คำสั่ง host ตามด้วยชื่อที่ต้องการถาม แล้วตามด้วย ip ของ DNS server ที่ต้องการใช้ถาม
[root@cent6 ~]# host www.google.com 127.0.0.1
Using domain server:
Name: 127.0.0.1
Address: 127.0.0.1#53
Aliases:
www.google.com has address 74.125.135.105
www.google.com has address 74.125.135.106
www.google.com has address 74.125.135.99
www.google.com has address 74.125.135.103
www.google.com has address 74.125.135.104
www.google.com has address 74.125.135.147
www.google.com has IPv6 address 2404:6800:4001:c01::93
[root@cent6 ~]#
หากไม่ได้ระบุ ip ของ DNS Server ในการถาม คำสั่ง nslookup, host หรือโปรแกรมอื่นๆ บนลีนุกซ์ (UNIX อื่นๆ ด้วย) โดยดีฟอลต์จะไปถาม ip ที่ระบุอยู่ในไฟล์ /etc/resolv.conf บรรทัดคอนฟิก nameserver
[root@cent6 ~]# cat /etc/resolv.conf
; generated by /sbin/dhclient-script
nameserver 192.168.1.1
ไม่แนะนำให้แก้ไขไฟล์นี้โดยตรง เพราะส่วนใหญ่แล้วไฟล์นี้จะถูกสร้างมาจากคำสั่งช่วยในการคอนฟิกเน็ตเวิร์ก เช่นบน CentOS, Red Hat ถูกแก้ไขมาจากคำสั่ง system-config-network หรือเมื่อมีการรีบู๊ตเครื่อง ไฟล์นี้จะแก้ไขมาจากไฟล์คอนฟิกที่อยู่ใน /etc/sysconfig/network-scripts/ ถ้าทดสอบอาจลองแก้ไขไฟล์ resolv.conf นี้โดยตรงได้ แต่ถ้าทดสอบแล้วใช้งานได้ ให้ใช้คำสั่ง system-config-network
อนุญาตให้เครื่องไคลเอ้นต์อื่นมาถามได้
เนื่องด้วยความปลอดภัย โดยดีฟอลต์การติดตั้ง bind คอนฟิกที่ให้มาจะอนุญาตเฉพาะตัวเซิร์ฟเวอร์เอง (127.0.0.1) มาใช้บริการ dns ได้
ถ้าต้องการให้เครื่อง client อื่นๆ สามารถมาใช้เซิร์ฟเวอร์ที่เราติดตั้งและคอนฟิกได้ ต้องทำสองขั้นตอน
- แก้ไขไฟล์ /etc/named.conf
- แก้ไข rule ใน iptables filrewall ของเครื่อง
ไฟล์คอนฟิกหลักของ BIND DNS Server (หรือบางคนก็เรียกว่า named) คือไฟล์ /etc/named.conf
ตัวอย่างไฟล์คอนฟิกที่ได้จากการติดตั้ง bind ด้วยคำสั่ง yum บน CentOS 6
[root@cent6 ~]# cat /etc/named.conf
//
// named.conf
//
// Provided by Red Hat bind package to configure the ISC BIND named(8) DNS
// server as a caching only nameserver (as a localhost DNS resolver only).
//
// See /usr/share/doc/bind*/sample/ for example named configuration files.
//
options {
    listen-on port 53 { 127.0.0.1; };
    listen-on-v6 port 53 { ::1; };
    directory "/var/named";
    dump-file "/var/named/data/cache_dump.db";
    statistics-file "/var/named/data/named_stats.txt";
    memstatistics-file "/var/named/data/named_mem_stats.txt";
    allow-query { localhost; };
    recursion yes;
    dnssec-enable yes;
    dnssec-validation yes;
    dnssec-lookaside auto;
    /* Path to ISC DLV key */
    bindkeys-file "/etc/named.iscdlv.key";
    managed-keys-directory "/var/named/dynamic";
};
logging {
    channel default_debug {
        file "data/named.run";
        severity dynamic;
    };
};
zone "." IN {
    type hint;
    file "named.ca";
};
include "/etc/named.rfc1912.zones";
include "/etc/named.root.key";
ใช้คำสั่ง netstat -an เพื่อแสดงสถานะการเปิดพอร์ต DNS (พอร์ต 53)
[root@cent6 ~]# netstat -an | grep 53
tcp      0    0  127.0.0.1:53    0.0.0.0:*     LISTEN
udp      0    0  127.0.0.1:53    0.0.0.0:*
หมายเหตุ เพื่อความง่าย ในที่นี้ขอแสดงสถานะการเปิดพอร์ตเฉพาะ IPv4 เท่านั้น
เพื่อจะอนุญาตให้เครื่องไคลเอ้นต์อื่นๆ สามารถมาใช้ DNS เครื่องนี้ได้ด้วย ต้องแก้ไขไฟล์คอนฟิก named.conf ดังนี้
- ใส่เครื่องหมาย comment หน้าบรรทัด listen-on port 53 หรืออาจลบทรรทัดนี้ออกไปเลย (ไม่แนะนำให้ลบ เพราะอาจมีความจำเป็นต้องแก้ไขกลับคืน)
- เพิ่มคอนฟิก allow-query-cache แล้วระบุ ip หรือ network ที่จะอนุญาตให้สามารถถามชื่อได้ (ไม่แนะนำให้เปิดทั้งหมด เพราะอาจเกิดปัญหา DDoS ได้) เช่นหากต้องการให้ทุกเครื่องที่อยู่ในวง 192.168.1.0/24 สามารถใช้ได้
ตัวอย่างการแก้ไข
[root@cent6 ~]# vi /etc/named.conf
...
options {
 //listen-on port 53 { 127.0.0.1; };
    listen-on-v6 port 53 { ::1; };
    directory "/var/named";
    dump-file "/var/named/data/cache_dump.db";
    statistics-file "/var/named/data/named_stats.txt";
    memstatistics-file "/var/named/data/named_mem_stats.txt";
    allow-query { localhost; };
 allow-query-cache {
 localhost;
 192.168.1.0/24;
 };
    recursion yes;
 ...
คำแนะนำ ในไฟล์คอนฟิก named.conf หลังเครื่องหมายวงเล็บปีกกา } จะมีเครื่องหมาย ; ปิดท้ายด้วย ผู้เขียนเคยพยายามหาว่าคอนฟิกผิดตรงไหนอยู่นานมาก ที่แท้ลืมใส่เครื่องหมาย ; ปิดท้าย
หลังการแก้ไขไฟล์คอนฟิก ใช้คำสั่ง service named restart เพื่อให้คอนฟิกมีผล
[root@cent6 ~]# service named restart
Stopping named:          [ OK ]
Starting named:          [ OK ]
ลองใช้คำสั่ง netstat -an เพื่อดูสถานะการเปิดพอร์ตอีกครั้้ง
สมมติว่าเซิร์ฟเวอร์ที่เราคอนฟิก DNS นี้อยู่มี ip เป็น 192.168.1.1
[root@cent6 ~]# netstat -an | grep 53
tcp    0    0 192.168.1.1:53      0.0.0.0:*   LISTEN
tcp    0    0 127.0.0.1:53        0.0.0.0:*   LISTEN
udp    0    0 192.168.1.1:53      0.0.0.0:*
udp    0    0 127.0.0.1:53        0.0.0.0:*
สังเกตว่าจะมีการรันพอร์ต 53 บน ip 192.168.1.1 เพิ่มขึ้นมา
ขั้นต่อไป ต้องแก้ไข rule ของ firewall บนเครื่องเซิร์ฟเวอร์เอง (ถ้ารันไว้ รวมทั้งอุปกรณ์ firewall ตัวอื่นๆ ที่อยู่ระหว่าง ไคลเอ้นต์และเซิร์ฟเวอร์)
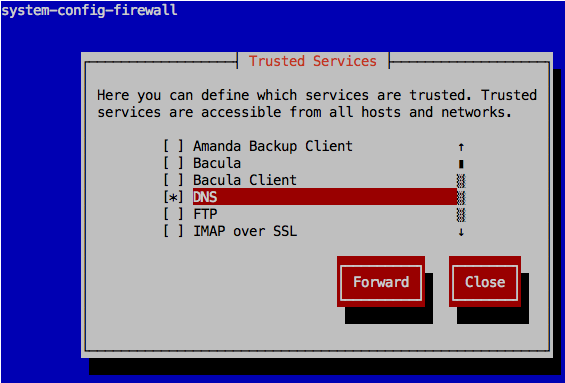
ใช้คำสั่ง system-config-firewall-tui เลือก Customize แล้วเช็คเลือก DNS ในหน้า Trusted Services เพิ่มเติม
หากดูไฟล์ /etc/sysconfig/iptables เพื่อดู rule ที่ถูกเพิ่มขึ้นมา
[root@cent6 ~]# cat /etc/sysconfig/iptables
# Firewall configuration written by system-config-firewall
# Manual customization of this file is not recommended.
*filter
:INPUT ACCEPT [0:0]
:FORWARD ACCEPT [0:0]
:OUTPUT ACCEPT [0:0]
-A INPUT -m state --state ESTABLISHED,RELATED -j ACCEPT
-A INPUT -p icmp -j ACCEPT
-A INPUT -i lo -j ACCEPT
-A INPUT -m state --state NEW -m tcp -p tcp --dport 22 -j ACCEPT
-A INPUT -m state --state NEW -m tcp -p tcp --dport 53 -j ACCEPT
-A INPUT -m state --state NEW -m udp -p udp --dport 53 -j ACCEPT
-A INPUT -j REJECT --reject-with icmp-host-prohibited
-A FORWARD -j REJECT --reject-with icmp-host-prohibited
COMMIT
ลองทดสอบจากเครื่องไคลเอ้นต์เครื่องอื่นดู
[user1@client ~]$ host www.google.com 192.168.1.1
Using domain server:
Name: 192.168.1.1
Address: 192.168.1.1#53
Aliases:
www.google.com has address 74.125.135.103
www.google.com has address 74.125.135.147
www.google.com has address 74.125.135.99
www.google.com has address 74.125.135.106
www.google.com has address 74.125.135.104
www.google.com has address 74.125.135.105
www.google.com has IPv6 address 2404:6800:4001:c01::67
ตอนต่อไป เราจะมาดูวิธีการคอนฟิก DNS เพื่อเก็บข้อมูลชื่อ domain หรือการแปลงชื่อเป็น ip ของเราเอง
ข้อมูลอ้างอิง
