บทความนี้จะอธิบายคอนฟิก MySQL Replication เพื่อ replicate ข้อมูลระหว่าง MySQL Database Server สองเครื่อง ทั้งแบบ Master-Slave และ Master-Master โดยทดสอบกับเวอร์ชั่น 5.5 ที่ติดตั้งบน CentOS 6
ระบบทดสอบ
เครื่อง MySQL Server#1 (DB1)
- IP : 192.168.5.61
- Hostname : cent6-db1
เครื่อง MySQL Server#2 (DB2)
- IP : 192.168.5.62
- Hostname : cent6-db2
แนะนำให้ใช้ MySQL เวอร์ชั่นเดียวกันทั้งสองเครื่อง ในที่นี้ทดสอบกับเวอร์ชั่น 5.5.37
คอนฟิกบนเครื่อง MySQL Server#1 (DB1)
แก้ไขคอนฟิกไฟล์ /etc/my.cnf เพื่อทำเป็น Replication
เพิ่มบรรทัดคอนฟิก log-bin และ server-id ภายใต้ [mysqld]
server-id เป็น id ประจำตัวของ MySQL Server แต่ละเครื่องที่จะทำ replication กัน ซึ่งต้องเป็นคนละค่ากัน
[root@cent6-db1 ~]# vi /etc/my.cnf
[mysqld]
log-bin=mysql-bin
server-id=1
ใช้คำสั่ง service เพื่อรีสตาร์ตเซอร์วิส MySQL เพื่อให้คอนฟิกที่แก้ไขใหม่มีผล
[root@cent6-db1 ~]# service mysqld restart
Stopping mysqld:                                           [  OK  ]
Starting mysqld:                                           [  OK  ]
รันคำสั่ง mysql เพื่อสร้างและอนุญาต (GRANT) user ให้เครื่อง DB2 (repl@192.168.5.62) สามารถมาทำ replicate ข้อมูลได้
[root@cent6-db1 ~]# mysql -u root -p
mysql> GRANT REPLICATION SLAVE ON *.* TO 'repl'@'192.168.5.62' IDENTIFIED BY 'repl1234';
Query OK, 0 rows affected (0.00 sec)
ในคำสั่ง mysql ใช้คำสั่ง SHOW MASTER STATUS ตรวจสอบสถานะของของ Replication Master
mysql> SHOW MASTER STATUS;
+------------------+----------+--------------+------------------+
| File             | Position | Binlog_Do_DB | Binlog_Ignore_DB |
+------------------+----------+--------------+------------------+
| mysql-bin.000001 |      107 |              |                  |
+------------------+----------+--------------+------------------+
1 row in set (0.00 sec)
คอนฟิกบนเครื่อง MySQL Server#2 (DB2)
แก้ไขคอนฟิกไฟล์ /etc/my.cnf เพื่อทำเป็น Replication
เพิ่มบรรทัดคอนฟิก server-id ภายใต้ [mysqld]
ถ้าต้องการคอนฟิก DB2 ให้เป็นแค่ SLAVE ไม่ได้ส่งต่อข้อมูลหรือเป็น MASTER ของเซิร์ฟเวอร์อื่นๆ ไม่จำเป็นต้องใส่ออปชั่น log-bin
แต่เราจะคอนฟิกเป็น DUAL-MASTER ของอีกเครื่องด้วย ต้องเปิดไว้
[root@cent6-db2 ~]# vi /etc/my.cnf
[mysqld]
log-bin=mysql-bin
server-id=2
ใช้คำสั่ง service เพื่อรีสตาร์ตเซอร์วิส MySQL เพื่อให้คอนฟิกที่แก้ไขใหม่มีผล
[root@cent6-db2 ~]# service mysqld restart
Stopping mysqld:                                           [  OK  ]
Starting mysqld:                                           [  OK  ]
รันคำสั่ง mysql เพื่อคอนฟิกเป็น Replication Slave
[root@cent6-db2 ~]# mysql -u root -p
mysql> CHANGE MASTER TO MASTER_HOST='192.168.5.61',
                        MASTER_USER='repl',
                        MASTER_PASSWORD='repl1234',
                        MASTER_LOG_FILE='mysql-bin.000001',
                        MASTER_LOG_POS=107;
Query OK, 0 rows affected (0.03 sec)
คำอธิบาย
- MASTER_LOG_FILE ดูค่า File จากคำสั่ง SHOW MASTER STATUS บนเครื่อง DB1
- MASTER_LOG_POST ดูค่า Position จากคำสั่ง SHOW MASTER STATUS บนเครื่อง DB1
รันคำสั่ง START SLAVE เพื่อเริ่มการทำ Replicate
mysql> START SLAVE;
Query OK, 0 rows affected (0.00 sec)
ดูสถานะของ Replicate SLAVE
mysql> SHOW SLAVE STATUS \G
*************************** 1. row ***************************
               Slave_IO_State: Connecting to master
                  Master_Host: 192.168.5.61
                  Master_User: repl
                  Master_Port: 3306
                Connect_Retry: 60
              Master_Log_File: mysql-bin.000001
          Read_Master_Log_Pos: 107
               Relay_Log_File: mysqld-relay-bin.000001
                Relay_Log_Pos: 4
        Relay_Master_Log_File: mysql-bin.000001
             Slave_IO_Running: Connecting
            Slave_SQL_Running: Yes
              Replicate_Do_DB:
          Replicate_Ignore_DB:
           Replicate_Do_Table:
       Replicate_Ignore_Table:
      Replicate_Wild_Do_Table:
  Replicate_Wild_Ignore_Table:
                   Last_Errno: 0
                   Last_Error:
                 Skip_Counter: 0
          Exec_Master_Log_Pos: 107
              Relay_Log_Space: 107
              Until_Condition: None
               Until_Log_File:
                Until_Log_Pos: 0
           Master_SSL_Allowed: No
           Master_SSL_CA_File:
           Master_SSL_CA_Path:
              Master_SSL_Cert:
            Master_SSL_Cipher:
               Master_SSL_Key:
        Seconds_Behind_Master: NULL
Master_SSL_Verify_Server_Cert: No
                Last_IO_Errno: 2003
                Last_IO_Error: error connecting to master 'repl@192.168.5.61:3306' - retry-time: 60  retries: 86400
               Last_SQL_Errno: 0
               Last_SQL_Error:
  Replicate_Ignore_Server_Ids:
             Master_Server_Id: 0
1 row in set (0.00 sec)

mysql>
หากคอนฟิกถูกต้อง ค่า ‘Slave_IO_State’ จะแสดงเป็น “Waiting for master to send event”
แต่ผลลัพธ์ที่ได้ค่า Slave_IO_State ยังแสดงค่าเป็น “Connecting to master” ดูค่า Last_IO_Error แสดงปัญหา “error connecting to master…”
สาเหตุหนึ่งที่เป็นไปได้คือบนเครื่อง MASTER หรือ DB1 มีการคอนฟิก firewall ไว้ ดีฟอลต์ firewall ของ CentOS 6 จะอนุญาตเฉพาะให้ ping กับ ssh
ดังนั้นเพื่อทำ replicate ได้ ต้องอนุญาตหรือเปิดพอร์ต mysql หรือ TCP พอร์ต 3306 บนเครื่อง Master
แก้ไข Firewall บนเครื่อง DB1
แก้ไขไฟล์คอนฟิก firewall /etc/sysconfig/iptables
[root@cent6-db1 ~]# vi /etc/sysconfig/iptables

# Firewall configuration written by system-config-firewall
# Manual customization of this file is not recommended.
*filter
:INPUT ACCEPT [0:0]
:FORWARD ACCEPT [0:0]
:OUTPUT ACCEPT [0:0]
-A INPUT -m state --state ESTABLISHED,RELATED -j ACCEPT
-A INPUT -p icmp -j ACCEPT
-A INPUT -i lo -j ACCEPT
-A INPUT -m state --state NEW -m tcp -p tcp --dport 22 -j ACCEPT
-A INPUT -m state --state NEW -m tcp -p tcp --dport 3306 -j ACCEPT
-A INPUT -j REJECT --reject-with icmp-host-prohibited
-A FORWARD -j REJECT --reject-with icmp-host-prohibited
COMMIT
ใช้คำสั่ง service เพื่อรีสตาร์ตเซอร์วิส iptables เพื่อให้คอนฟิก firewall ใหม่มีผล
[root@cent6-db1 ~]# service iptables restart
iptables: Setting chains to policy ACCEPT: filter          [  OK  ]
iptables: Flushing firewall rules:                         [  OK  ]
iptables: Unloading modules:                               [  OK  ]
iptables: Applying firewall rules:                         [  OK  ]
ลองรัน SHOW SLAVE STATUS อีกครั้งบน DB2
mysql> SHOW SLAVE STATUS \G
*************************** 1. row ***************************
               Slave_IO_State: Waiting for master to send event
                  Master_Host: 192.168.5.61
                  Master_User: repl
                  Master_Port: 3306
                Connect_Retry: 60
              Master_Log_File: mysql-bin.000002
          Read_Master_Log_Pos: 107
               Relay_Log_File: mysqld-relay-bin.000003
                Relay_Log_Pos: 253
        Relay_Master_Log_File: mysql-bin.000002
             Slave_IO_Running: Yes
            Slave_SQL_Running: Yes
              Replicate_Do_DB:
          Replicate_Ignore_DB:
           Replicate_Do_Table:
       Replicate_Ignore_Table:
      Replicate_Wild_Do_Table:
  Replicate_Wild_Ignore_Table:
                   Last_Errno: 0
                   Last_Error:
                 Skip_Counter: 0
          Exec_Master_Log_Pos: 107
              Relay_Log_Space: 556
              Until_Condition: None
               Until_Log_File:
                Until_Log_Pos: 0
           Master_SSL_Allowed: No
           Master_SSL_CA_File:
           Master_SSL_CA_Path:
              Master_SSL_Cert:
            Master_SSL_Cipher:
               Master_SSL_Key:
        Seconds_Behind_Master: 0
Master_SSL_Verify_Server_Cert: No
                Last_IO_Errno: 0
                Last_IO_Error:
               Last_SQL_Errno: 0
               Last_SQL_Error:
  Replicate_Ignore_Server_Ids:
             Master_Server_Id: 1
1 row in set (0.00 sec)

mysql>
ค่า ‘Slave_IO_State’ เปลี่ยนเป็น “Waiting for master to send event” แล้ว
ทดลองสร้าง database ชื่อ test1 บน Master DB1
[root@cent6-db1 ~]# mysql -u root -p
mysql> CREATE DATABASE test1;
Query OK, 1 row affected (0.00 sec)
หากคอนฟิกถูกต้อง ลองใช้คำสั่ง SHOW DATABASES บนเครื่อง DB2 ดู จะเห็นชื่อ DATABASE test1 ขึ้นมาโดยอัตโนมัติ
[root@cent6-db2 ~]# mysql -u root -p
mysql> SHOW DATABASES;
+--------------------+
| Database           |
+--------------------+
| information_schema |
| mysql              |
| performance_schema |
| test1              |
+--------------------+
4 rows in set (0.00 sec)
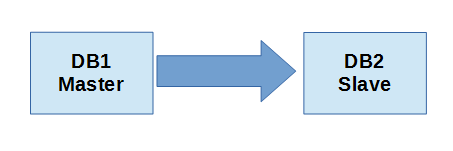
ถึงตรงนี้การคอนฟิก MySQL Replicate จะเป็นการ replicate ข้อมูลจาก DB1 ที่ทำหน้าที่เป็น Master ไปยัง DB2 ที่ทำหน้าที่เป็น Slave เท่านั้น หมายถึงถ้ามีการเปลี่ยนแปลงข้อมูลบน DB1 ข้อมูลจะถูก replicate ไปยัง DB2 โดยอัตโนมัติ ตามรูป
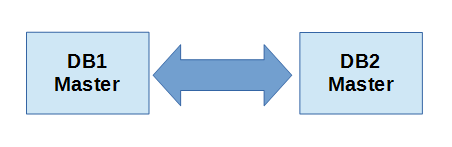
คอนฟิก Dual-Master MySQL Replication
ในทำนองกลับกัน หากต้องการให้ DB2 เป็น Master ด้วย เพื่อให้ DB1 ทำหน้าที่เป็น Slave ดึงข้อมูลจาก DB2 เราสามารถทำได้โดยขั้นตอนเดียวกันเพียงแต่สลับเครื่อง
บนเครื่อง DB2 สร้างและอนุญาต (GRANT) user ให้เครื่อง DB1 (repl@192.168.5.61) สามารถมาทำ replicate ข้อมูลได้
[root@cent6-db2 ~]# mysql -u root -p
mysql> GRANT REPLICATION SLAVE ON *.* TO 'repl'@'192.168.5.61' IDENTIFIED BY 'repl1234';

mysql> SHOW MASTER STATUS;
+------------------+----------+--------------+------------------+
| File             | Position | Binlog_Do_DB | Binlog_Ignore_DB |
+------------------+----------+--------------+------------------+
| mysql-bin.000001 |      262 |              |                  |
+------------------+----------+--------------+------------------+
แก้ไขไฟล์คอนฟิก /etc/sysconfig/iptables แล้วรีสตาร์ตเซอร์วิส iptables
[root@cent6-db2 ~]# vi /etc/sysconfig/iptables
...
-A INPUT -m state --state NEW -m tcp -p tcp --dport 3306 -j ACCEPT
...

[root@cent6-db2 ~]# service iptables restart
iptables: Setting chains to policy ACCEPT: filter          [  OK  ]
iptables: Flushing firewall rules:                         [  OK  ]
iptables: Unloading modules:                               [  OK  ]
iptables: Applying firewall rules:                         [  OK  ]
บนเครื่อง DB1 คอนฟิกเป็น Slave เพื่อให้ดึงข้อมูลจาก DB2
mysql> CHANGE MASTER TO MASTER_HOST='192.168.5.62',
                        MASTER_USER='repl',
                        MASTER_PASSWORD='repl1234',
                        MASTER_LOG_FILE='mysql-bin.000001',
                        MASTER_LOG_POS=262;
Query OK, 0 rows affected (0.03 sec)
บน DB1 รันคำสั่ง START SLAVE เพื่อคอนฟิกเป็น Replication Slave
mysql> START SLAVE;
Query OK, 0 rows affected (0.01 sec)
ถึงตรงนี้การคอนฟิกแบบนี้จะเป็นการทำ DUAL-MASTER คือไม่ว่าเราจะแก้ไขฐานข้อมูลบนเครื่องไหน ข้อมูลก็จะถูก replicate ไปอีกเครื่องโดยอัตโนมัติ